Adding a Site
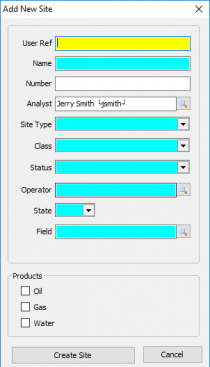 The window for adding a new site To add a site select the Add button under the tree view.
This will bring up the window to the left and required the following inputs.
| User Ref
|
A user defined nickname for the Site.
|
| Name
|
The Name for the site. Note the Name is used in the regulatory reporting modules when a well or lease name is required.
|
| Number
|
The Number for the Site. Note the Number is used in the regulatory reporting modules when a well number is required.
|
| Analyst
|
The Analyst name automatically fills in with the name of the User performing the Add. However, any Analyst previously set up may be chosen for the new site by clicking the spy glass and double clicking the Analyst to be assigned to the Site.
|
| Site Type
|
Assign the Site Type from the drop down.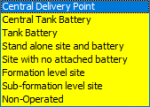
|
| Class
|
Assign the Class from the drop down. Class is implicated in certain agency regulatory reports.
|
| Operator
|
Type the Operator name or click on the spy glass for Address Book entries categorized as Operator(s).
|
| State
|
Assign the State
|
| Field
|
Assign the Field. Start typing the Field name or click on the spy glass for Fields already available in the State. Field is implicated in certain agency regulatory reports. Congruency with the Agency is important.
|
| Products
|
Check the Products applicable to the Site. Products will be created and displayed for editing on the Products tab.
|
When Complete click Create Site to create the base Site Information and access to the General Site Maintenance tab.
Cloning a Site
To Clone a Site, select the Site to be cloned and click Clone. The following window displays:
Clone Type
The Clone Type drop down selections are Standard Clone and Clone to Disposal Site.
Cloning to a disposal site will bring over all the same info but change the Site type, Class, and Status. This can be modified in the General tab.
Deleting a Site
To Delete a site, select the Site and click Delete.
The following warning is displayed:
If the site has no production behind it it will delete it. If it does you will have to do the override by entering the user_ref.
Site Maintenance Tabs
General
| User Ref
|
A user defined nickname for the Site
|
| Name
|
The Name for the site. Note the Name is used in the regulatory reporting modules when a well or lease name is required.
|
| Number
|
The Number for the Site. Note the Number is used in the regulatory reporting modules when a well number is required.
|
| Pad Name
|
Relates multiple sites to the same physical location.
|
| Route
|
The Pumper Route the site is on. A Route must be assigned to enable data entry in PumperX2. Use the Route editor to maintain Routes.
|
| Test Entry
|
Options are Enabled, Disabled, or Read Only. Enabled allows Test(s) to be entered in PumperX2. Read Only displays the test values (if the column is displayed) for reference in PumperX2.
|
| Wellbore Profile
|
Select Vertical, Horizontal, Directional, or Sidetrack.
|
| PumperX2 Layout
|
Select an available Layout. Layouts control the columns displayed in PumperX2. If a Layout is not defined the default Layout will be used. If a default has not assigned all Columns are displayed. Layouts are maintained in PumperX2 Layout Manager under the Admin menu.
|
| Enable Dual Tank Strap (Color Cut) Entry
|
Check to enable Color-cut (two) gauge entries. The program default behavior is a single gauge per tank per day.
|
| Process In Monthly Production
|
Check to enable Monthly production entry. Only the Sites requiring the Monthly production true up should be checked.
|
| Site Type
|
Options are:
- Central Delivery Point
- Central Tank Battery
- Tank Battery
- Standalone site and Battery
- Site with no attached Battery
- Formation Level Site
- Sub-Formation Level Site
- Non-Operated
|
| Class
|
Oil, Gas, Condensate, or Water. The well's Class does not generally change once it is set up.
|
| Status
|
Select the status from the drop down. Status can change over time during the life of a site.
|
| Reporting Dates
|
These dates control whether a site is included in regulatory and internal reports where indicated.
- Federal: For regulatory reporting to a federal agency.
- State: For regulatory reporting to the state agency.
- Internal: For Prams internal use such as generated reporting that can filter by internal date.
|
| State/County/Field/Formation
|
Assign the applicable value. State and County are delivered with the software. Field and Formation are maintained by the Client.
|
| Defined Products
|
This will show products if any that gave an allocation be it daily or monthly.
|
| Comments
|
Allows the analyst to keep notes of a wells history.
|
| ID(top right)
|
The site identifier typically used for queries.
|
| Record History
|
This will show a Created date for when the site was made. It also has an Updated date that show the user who last modified the site.
|
Products
Products types are Oil, Condensate, Gas or Water. All production volumes are associated to a product.
Sites can have an unlimited number of Products (to include Products of the same type) to accommodate the various internal data capture and regulatory reporting requirements.
Each Product has a separate information page accessed by clicking the Product.
When creating products, the order of creation will determine what order the Production Entry screens will appear.
Oil
| Product
|
The Product Type
|
| Name
|
The Name of the Product. The Name is displayed in Product Site Maintenance and during Monthly Production Entry.
|
| Show in PumperX2
|
Checked allows daily data entry and display in Pumper.
|
|
|
Transporter/Buyer Information
|
| Transporter
|
Assign the Transporter of the Oil Product. The Transporter must be in the Address Book and marked "Available in agency reporting". Certain agency (ND, MT, and LA) reporting requires the Transporter on the monthly reports. Use the Search icon to display available Address Book entries. Use Jump to Address Book under the Tools menu to add an Address Book entry.
|
| Purchaser
|
Assign the Purchaser of the Oil Product. The Transporter must be in the Address Book and marked "Available in agency reporting". Certain agency (ND & MT) reporting requires the Transporter on the monthly reports. Use the Search icon to display available Address Book entries. Use Jump to Address Book (bottom left of the lookup display) to add an Address Book entry.
|
| Processor
|
Primarily used for Gas Products
|
| Source / Destination
|
The operator that is the receiver of the product has to report who gave them the product and how it was disposed of. In LA, oil or gas from one field/operator can be shipped to another field/operator for sale because the first field/operator does not have a sales connection. On the LA report, the operator that is sending the product needs to report the Source/Destination of the product by operator and field.
|
|
|
Oil Tanks
|
| Oil Tank Setup
|
Existing Tanks that belong to the product are displayed here. To learn how to add a tank see: Tank Setup
|
| Product Notes
|
Free form note pad for reference.
|
|
|
Oil Meters
|
| Oil Meter Setup
|
Existing Meters are Listed. To learn more click here.
|
|
|
Monthly Entry Methods
|
| Trans Type
|
Select from the drop down: Pipeline, Truck, Barge, or Rail-car.
|
| Skip Production Entry
|
Check to skip the Product during Monthly Production Entry. The program will automatically place zeros in the monthly production record marking the Product complete.
|
| Off Lease Sales (OGOR)
|
Check to exclude the Product from OGOR report part C inventories. Off lease sales reported, primarily used for liquids stored off lease (Drip, Plant Condensate, Skim Oil, Off lease inventory, and Sales ).
|
|
|
Allowable
|
| Period
|
Amount of oil which a site, leasehold, or field may produce per Day or Month. Primarily used for Texas RRC reporting.
|
| Amount
|
The specified amount of daily or monthly allowance of oil.
|
|
|
Commingling
|
| Facility ID
|
The name of the commingling facility, if applicable. Primarily used for Texas RRC reporting applicable to a Form P-17 filing.
|
| Facility #
|
The facility/permit number, if applicable.
|
|
|
Meter/Facility IDs
|
| Fed Meter
|
Enter the Federal Meter id. Only used for Federal Offshore reporting, ONRR is assessing implementing meter reporting requirements for onshore properties.
|
| Fed Facility
|
Enter the Federal Facility id. Only used for Federal Offshore reporting, ONRR is assessing implementing facility reporting requirements for onshore properties.
|
| State Meter
|
Enter the State Meter id. Not currently used in any Agency reporting.
|
| State Facility
|
Enter the State Facility id. Current usage is for NM Point of Disposition (POD) reporting requirement.
|
|
|
Starting Volumes
|
| Default Gravity
|
The default gravity used when a gravity is not available in the transactional records being reported.
|
| Cum Prod Grs
|
The default gross production used when a volume is not available in the transactional records being reported.
|
| Cum Prod Net
|
The default net production used when a volume is not available in the transactional records being reported.
|
| Cum Overage
|
The default total overage used when a volume is not available in the transactional records being reported.
|
|
|
Record History
|
| Record History
|
ID: Shows what the product id is for querying.
Shows a created date when the product was made and by what user.
|
Gas
| Product
|
The product type
|
| Name
|
The Name of the Product. The Name is displayed in Product Site Maintenance and during Monthly Production Entry.
|
| Show in PumperX2
|
Checked allows daily data entry and display in Pumper.
|
|
|
Transport/Buyer Information
|
| Transporter
|
Assign the Transporter of the Gas Product. The Transporter must be in the Address Book and marked "Available in agency reporting". Certain agency (ND, MT and LA) reporting requires the Transporter on the monthly reports. Use the Search icon to display available Address Book entries. Use Jump to Address Book (bottom left of the lookup display) to add an Address Book entry.
|
| Purchaser
|
Assign the Purchaser of the Gas Product. The Transporter must be in the Address Book and marked "Available in agency reporting". Certain agency (ND, MT) reporting requires the Transporter on the monthly reports. Use the Search icon to display available Address Book entries. Use Jump to Address Book (bottom left of the lookup display) to add an Address Book entry.
|
| Processor
|
Assign the Processor of the Gas Product. The Processor must be in the Address Book and marked "Available in agency reporting". Federal reporting of onshore processed gas (Disposition code 11) requires the Plant Id to be reported. The Plant/facility id is maintained in the Location column.
|
| Source
|
In LA, oil or gas from one field/operator can be shipped to another field/operator for sale because the first field/operator does not have a sales connection. On the LA report, the operator that is sending the product needs to report the Destination of the product by operator and field. The operator that is the receiver of the product has to report who gave them the product and how it was disposed of.
|
| Destination
|
In LA, oil or gas from one field/operator can be shipped to another field/operator for sale because the first field/operator does not have a sales connection. On the LA report, the operator that is sending the product needs to report the Destination of the product by operator and field. The operator that is the receiver of the product has to report who gave them the product and how it was disposed of.
|
|
|
Gas Defaults
|
| Default Code
|
Default codes are used in monthly production and monthly allocations to automatically calculate or fill in dispositions based on the code and value entered. Click the search icon to view/select from a list of the codes and explanations which can also be found in the Definitions section of the Help doc
|
| Default Value
|
The value used in conjunction with the default code if specified.
|
| Default BTU
|
The default BTU to be used in monthly production processes if not entered from a sales statement.
|
| Pressure Base
|
The Pressure Base at which the entered information is captured and stored. It does NOT have to be the required state agency pressure base. Agency and some internal reports will convert the reported volumes to the appropriate state pressure base when required.
|
| Basis
|
Refers to how the reported BTU is calculated: Dry versus Wet (saturated)
|
| Enter MMBTUs
|
Enables the MMBTU volume to show in pumper.
|
|
|
Gas Meters
|
| Gas Meter Setup
|
Existing Meters are Listed. To learn more click here.
|
| Product Notes
|
Free form notes entry section for reference.
|
|
|
Monthly Entry Methods
|
| Trans Type
|
Select from the drop down: Pipeline, Truck, Barge, or Railcar.
|
| Skip Production Entry
|
Check to skip the Product during Monthly Production Entry. The program will automatically place zeros in the monthly production record marking the Product complete.
|
|
|
Allowable
|
| Period
|
Select the time period the Allowable Amount applies.
|
| Amount
|
Enter the Allowable Amount if applicable.
|
|
|
Meter/Facility IDs
|
| Fed Meter
|
Enter the Federal Meter id. Only used for Federal Offshore reporting, ONRR is assessing implementing meter reporting requirements for onshore properties.
|
| Fed Facility
|
Enter the Federal Facility id. Only used for Federal Offshore reporting, ONRR is assessing implementing facility reporting requirements for onshore properties.
|
| State Meter
|
Enter the State Meter id. Not currently used in any Agency reporting.
|
| State Facility
|
Enter the State Facility id. Current usage is for NM Point of Disposition (POD) reporting requirement.
|
|
|
Starting Volumes
|
| Cum Prod Grs
|
The cumulative volume of production for production periods not in the PRAMSX2 database. This volume is added to the volumes in the database when reporting cumulative production (e.g. 7 Day Prod /w Cums report)
|
| Cum Prod Net
|
not used
|
| Cum Overage
|
The running overage relative to the Allowable.
|
Water
| Product
|
The product type
|
| Name
|
The Name of the Product. The Name is displayed in Product Site Maintenance and during Monthly Production Entry.
|
| Show in PumperX2
|
Checked allows daily data entry and display in Pumper.
|
| Project Type
|
The Project Type input field could be defined like a secondary recovery program.
|
|
|
Transport/Destination Information
|
| Transporter
|
Transporter/Destination Information is the same as for the other products.There are no processor, source or buyer information on this page. Assign the Transporter of the Water Product. The Transporter must be in the Address Book and marked "Available in agency reporting". Certain agency (ND, MT and LA) reporting requires the Transporter on the monthly reports. Use the Search icon to display available Address Book entries. Use Jump to Address Book (bottom left of the lookup display) to add an Address Book entry.
|
| Destination
|
On the LA report, the operator that is sending the product needs to report the Destination of the product by operator and field. The operator that is the receiver of the product has to report who gave them the product and how it was disposed of.
|
|
|
Monthly Production Defaults
|
| Defaults
|
The Monthly Production Defaults allow you to Create a monthly water production value based on one of three options.
- Code A is a fixed amount of production entered as the Default Value.
- Code B is a calculated value based on the Default Value times the number of days a well is on.
- Code C is a calculated value based on the Water/Oil ratio is the Water per BBL of Oil value entered in the Default Value position.
|
| Disposal
|
The Disposal code is the default method of disposal of the water:
The default method is unlined pit if no other disposition is noted. During monthly production entry, this will be the default method but you can override the default as needed.
|
|
|
Water Tanks
|
| Water Tank Setup
|
Existing Tanks will be listed. Tank setup will be similar to other tank setups to learn how to set up tanks click here
|
|
|
Water Meters
|
| Water Meter Setup
|
Existing Meters are Listed. To learn more click here.
|
|
|
Meter/Facility IDs
|
| Fed Meter
|
Enter the Federal Meter id. Only used for Federal Offshore reporting, ONRR is assessing implementing meter reporting requirements for onshore properties.
|
| Fed Facility
|
Enter the Federal Facility id. Only used for Federal Offshore reporting, ONRR is assessing implementing facility reporting requirements for onshore properties.
|
| State Meter
|
Enter the State Meter id. Not currently used in any Agency reporting.
|
| State Facility
|
Enter the State Facility id. Current usage is for NM Point of Disposition (POD) reporting requirement.
|
|
|
Starting Volumes
|
| Cum Prod Grs
|
The cumulative volume of production for production periods not in the PRAMSX2 database. This volume is added to the volumes in the database when reporting cumulative production (e.g. 7 Day Prod /w Cums report)
|
| Cum Prod Net
|
not used
|
| Cum Overage
|
The running overage relative to the Allowable.
|
Location
The Location tab allows defining the physical location of a site within a state.
The panel is divided into five sections to describe the surface and bottom hole locations for the site:
| Legal Description
|
Where an analyst can add a legally written descriptoin.
|
| Surface
|
Where the wells legal boundaries are.
You can enter quarter quarter sections, sections, township, range, PM, and elevation data. For Texas data, you can enter survey and blocks information.
|
| Bottom Hole
|
Where the well inevitably ends up at.
You can enter quarter quarter sections, sections, township, range, PM, and elevation data. For Texas data, you can enter survey and blocks information.
|
| Surface Coordinates
|
The longitude and latitude of the site.
|
| Bottom Hole Coordinates
|
The longitude and latitude where the hole bottoms out.
|
Company
The Site Maintenance Company tab allows the entry of company specific information such as Working Interest, Net Revenue Interest (NRI), Office, District, Engineer, etc. for a site. Clicking on the Company tab displays the panel below.
Permission to add, edit or delete data in this panel is set in the Admin / User Role Management permissions section.
Subsection Company
| WI/NRI
|
Working Interest (WI) and Net Revenue Interest (NRI) are date sensitive entries and are entered in decimal form, i.e. .75, .50.
Except for Working Interest (WI) and Net Revenue Interest (NRI), all other data items in the panel are for informational purposes only and are available for other reports as needed.
When entering WI or NRI data in a new well, the program will assume those values apply to all dates, daily and/or monthly until a new date is entered.
When you change the WI or NRI data, AnalystX2 can "recalculate" the monthly/daily with the new values for past periods. To do this, click on the small clock icon and input a start and stop date for the recalculation.
Except for Working Interest (WI) and Net Revenue Interest (NRI), all other data items in the panel are for informational purposes only and are available for other reports as needed.
|
| Field Office
|
The office is responsible for monitoring and regulating all actions related to the exploration, drilling, storage and production of oil and natural gas.
|
| Foreman
|
The person who works at a well site overseeing extraction operations.
|
| District Area
|
The district the site is in.
|
| Prospect
|
The area of exploration.
|
| Engineer
|
The person who oversees the entire site.
|
| Engineer Asst.
|
The person who helps out the Engineer
|
| Production Tech
|
The person who oversees any production numbers and other site activities.
|
| Purchased From
|
Who the site was purchased from.
|
Dollars To Date
| Gross Costs
|
How much money has been spent with no calculations added.
|
| Net Costs
|
How much has been spent after deductions.
|
| Gross Revenue
|
How much profit has been made with no other calculations.
|
| Net Revenue
|
How much profit has been made after deductions.
|
Info
| First Oil Sale
|
The first time the site had sold oil.
|
| First Gas Sale
|
The first time the well had a gas sale.
|
| First Production
|
The first time production was made after completions.
|
| Spud Date
|
The start of the well drilling process.
|
| Completion Date
|
The date the well had moved out of completion.
|
| Total Depth
|
The depth of the bottom of the well. Usually, it is the depth where drilling has stopped.
|
| Spot Rate
|
The current price in the marketplace at which a given asset—such as a security, commodity, or currency—can be bought or sold for immediate
|
| Producing Interval
|
The section of wellbore that has been prepared for production by creating channels between the reservoir formation and the wellbore.
|
Xref
Although there are many data items in the primary input pages that can be used to control or sort against, there are always "other" identifiers that don't fit the "standard" data items. Xref section of the Site file allows the input of such items.
X ref are alphanumeric items used as references for moving data between AnalystX2 and a Third-Party software, examples being Bolo and Aries.
The first 6 items of the list are standard items that most companies use for data exchanges.
The Accounting item would denote the internal ID of this site in a company accounting system. The same principal applies to the terms Economics, Marketing, Other Operator ID, and the two miscellaneous terms.
If used, the Accounting data position MUST refer to the same thing in all sites.
If required, each of the items in this section can be renamed by clicking on the cog icon to the right of the input box.
The other 9 identifiers, User Xref(1-9), may be used as reporting or control items and can be changed with the cog icon.
Any item name change will change that name for ALL sites in the data base. An example being: you can't use User Xref 1 for a work over date in one well site and as something else in another site.
Regulatory
The Regulatory tab is a depository for critical information used for State and Federal reporting.
This panel contains five sections: general, state, federal lease/MMS Agreement#, Well count, and Federal. The order of data input is controlled only by what data is required for the site.
State and Federal site Identification numbers, Permit numbers, Federal Lease/ Agreement numbers are inserted here. These critical numbers are required for creating State and Federal reports.
The General Section a 14 digit API number, is required for State reporting. The Lease Name or Number is a requirement for certain, but not all state agencies.
The State Section if the site is not reported to any state agency, these boxes may be left blank.
The Well Count Section is used only for Montana reports. However, many users, use this panel to account for the number of wells included in a site allocation.
The Federal Section a Federal Well Code is currently used only for Offshore reports. The Interval Code is a three-character code related to the number of open intervals in a well. An example of the interval code is S01.
- The Participating Area is operator information only.
- The NGPA class is no longer used but there can still be some old gas contracts related to the old NGPA rules.
- If any well on a report is part of an Indian Lease, the whole report is marked as Indian even though not all wells in the report are on Indian lands.
If a well is drilled on a Federal lease, the Federal Agreement number or Federal Lease number is required. Because Federal lease numbers can change over time, all Federal Agreement or Federal Lease numbers related to a site or used on the Federal OGOR report, must be recorded in the Federal Agreement number box.
To add a new federal lease: Click add > Type in a new lease name or use the spy glass icon to find the name of an existing federal lease > Select the type of lease FED or MMS > Add a start period > click OK.
The new lease agreement appears in the box. If a site is to be reported under a new lease, you must end date the active lease before adding the new lease.
Highlight the current lease > Click Edit > Add a stop date > Click OK >Click Add to enter a new lease and use a start date > The day after the end date > Click OK.
By maintaining leases using effective date, the regulatory reporting process will automatically take care of the stock transfers when the report is filed.
After clicking OK the site is using the second Federal Lease Number and complies with Federal regulations for the site.
Click Save Changes to record the new data in the regulatory tab.
Gas Analysis
The Gas Analysis tab allows entering gas composition data, ie. the amount of methane, carbon dioxide, nitrogen, etc as determined by a sample analysis.
Permission to add, edit or delete data is set in Admin / User Role Management.
Gas analysis data may be entered into a site file in two ways: via direct entry or by an external file upload.
To see or enter data > Select the desired site > Then click on the Gas Analysis tab > Click Add New Sample > The following display will appear:
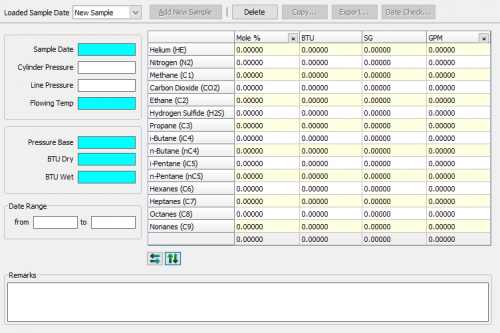
The 5 blue highlighted boxes are required fields.
Gas analysis information can vary widely based on the needs of the company. Some operators require everything while others need only data through C5 and everything else is listed as C6.
In most cases, the Mole % value is the only value that is required.
BTU and Specific Gravity (SG) values may not be needed.
GPM (gallons per million cubic feet) can be calculated based on industry standards or it could be manually entered. AnalystX2 will calculate GPM base on industry standards. Click the small  icon on the right of the GMP heading. icon on the right of the GMP heading.
Mole % values are decimal and do not always add up to 100%. The icon next to the heading "Mole %" will adjust the total by adding or subtracting from the Methane value (C1) in order to make the total add up to 100%.
The Date Range items allow you to specify the date range for applying the gas analysis.
The other buttons at the top of the screen allow deleting an existing analysis, copying an analysis to another site, exporting the data in an XLS file format, or checking the dates for which the samples were entered.
Equipment
This tab allows entering three types of data; entering whether or not any Pollution Control Equipment (combustor or vapor recovery) exist for a site, indicating whether or not a weekly inspection is reported and what equipment will be assigned to the site.
Permission to enter data into this tab is set in Admin/User Role Management under the Daily Section.
Air Pollution Control Equipment Section:
Radial check buttons specify whether a combustor or vapor recovery units exist on site. Selecting one of these types causes PumperX2 to include the APCE reporting group on the production tab, assuming the APCE group is included in the assigned layout for PumperX2.
The entry group contains equipment status (on/off) and whether an inspection is recorded. Optionally a weekly inspection requirement can be specified.
Other Equipment Section:
To add an item of equipment to a site, first a defined class of equipment must exist in Equipment Definitions.
Equipment entered in the Other Equipment section serves two distinct roles within AnalystX2.
The first role allows capture of operational data associated with the equipment for use in internal and external reports.
The second role captures fuel usage data that may be applied directly to the well the equipment is attached to or used in an allocation to provide for adding back production volumes that do not exist at the source.
Equipment may be defined and associated to a specific site in this tab. Equipment items can be defined for any class of site.
To allow for segregating equipment within PumperX2 there is a specific class (Equipment) that can contain only equipment items. This allows you to create 'stops' for the pumper that are distinct from other sites that appear in the selection tree for a route.
Click Add and the New Equipment Period window open > Enter a name for the equipment item and specify it's class and start date, (format MM/DD/YYYY) > Click 'Save'.
The Equipment Setup window is where the equipment information can be input:
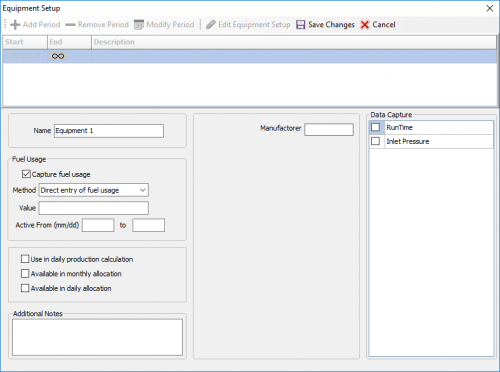
Five sections of the panel define
| Name
|
The display name of the equipment, used where ever the equipment is referenced.
|
| Fuel Usage
|
Reports fuel usage: If yes, click the check box and select the method of data capture parameters. If no, continue without checking box.
- Direct Entry Of Fuel Usage means that you will manually enter some value every day or month.
- Acquire From Defined Meter means that you have defined a separate gas meter to record the fuel usage for this piece of equipment.
- Fixed valuecan be set to month, day, or hour and will apply the set number to the well for that period. This number is placed in the Value box.
- Active From items allow you to specify the production dates for which this equipment setup is functional.
|
| Notes
|
Allow the analyst to input details about the equipment
|
| Properties
|
Allow the analyst to set the equipment to be used in the daily production calculation and available in the monthly / daily allocation.
|
| Data Capture
|
Since you may setup several data capture items for an equipment class but may need only certain ones for a single piece of equipment you will need to place a check mark next to the data items you want to capture for this one piece of equipment. Runtime and Inlet Pressure can me checked.
|
Production
The Production tab displays two simple charts showing monthly and daily data.
The monthly chart shows the complete monthly production history while the daily charts shows only the last 30 days of production. To the right of each chart are the production values.
Data for Monthly and Daily charts may be erased from display by using the Delete buttons only if the permission is allowed in User Role Management.
Removing the monthly data will reopen the monthly process while deleting daily data will remove that row of information from the gauge sheet.
These screens however, are for review purposes only. For a more detailed examination of production history, use InsightX2
Adding Test Data
You can directly add in data by going to the Site > Production Tab > Bottom right of the screen select Daily Tests > Edit Daily Test Records.

This is part of the Daily Processes section, Daily Test Maintenance.
Forecast
In this panel, you can import or manually input data to calculate a forecast of production and quickly view a graph of the monthly data.
Creating a Forecast
On the top row, you can select a Forecast type. This list can grow as data in input manually or imported.
To create a new Forecast type > Click types >Select new type in the lower left corner > The Forecast Type Definition panel appears > Input a name > The description is optional.
In the Daily Forecast Derivation Method, select one of the two options:
- divide the monthly value by the number of days in the month or use a fixed divisor.
- The fixed divisor by default is 30 days per month, however any required number may be used.
Next select whether or not you want the forecast to appear in the PumperX2 display by checking the box.
Types may be deleted using the Delete button in the lower left corner.
When done, Click Save Changes. To close the panel, click the X in the upper right.
The panel on the left is ready for manually entering data. You can enter as many months as needed. When done Click Save Changes to produce a Forecast graph.
In the display, Green represents oil, red equals gas, and blue represents water.
import forecast
Click the Import Button and the following screen appears:
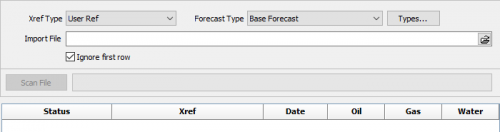
At the top of this display are the import control items.
Xref Type refers to what item in the site record is used as the import control.
Click the drop-down arrow to view the possible control items.
For example, you could use the Accounting id number or the economics id number as possible control items.
Next choose the forecast type by using the Forecast type drop down menu. If needed, you can also create a new type by using the Types button and following the steps from the previous section.
When the Import File button is clicked, it designates the location and name of the import file. Import Files can be either XLS, CSV, or TAB Delimited.
Each row of the file must have a well identifier and period defined however, you can include as many sites and periods as required.
The following is a workflow example of how to import a forecast file:
>Use the Xref drop-down menu to Specify the well identifier type
> Click the drop-down menu to Specify the forecast type
> If your file contains a header row, Check the 'Ignore first row' box
> In the Import file box use the icon on the right to navigate to the import file
> Select the file > Click 'Scan File' to examine the file.
> When the scan completes, review the data for any error messages
> If no errors are found, click 'Start Import' to initiate the import
> Close the Import Forecast tab.
The imported data may be displayed. If not choose, the correct Forecast Type from the drop-down.
Diary
The Diary section is a text based panel for users to add occasional or daily comments and notes regarding the highlighted site.
Input is done by adding text in the text bar at the bottom of the display. Once a note is entered, click on Submit and the note is added in the space above.
Permission to add, delete entries can be found in Admin / User Role Management Permission section.
Documents
The Documents section allows for site specific documents to be uploaded into categories to later be viewed or downloaded depending on restrictions set in User Role Management.
Enabling Site Documents
Go to AnalystX2 > Admin > User Role Management
Once in User Role Management go to the General section and at the very bottom under Site Documents, there are a few options.
- No Access - Default - The Documents tab will not show.
- Download Documents - Only allows for downloading of files.
- Upload & Download Documents - Like the previous category but allows for documents to imported into the system.
- Manage Documents - Like the previous category but allows for deletion of documents.
- Manage Documents & Categories- Like the Previous category but allows for the creation and deletion of categories.
Note That if Site Maintenance is open it will need to be closed and reopened for changes to take affect.
Creating Categories
Once enabled and Site Maintenance is refreshed at the bottom of the Documents tab three buttons will appear:
- View Site List - Allows to see all sites that have files within the selected category.
- Add Category - Create a new category that applies to All Sites. This name cannot be changed once its been added. When created the list will be sorted in an alphanumeric fashion.
- Delete Category - Remove a category that has no files associated with it across all sites that have files within the category.
Modifying Files
After a category has been created it will allow for the upload, download, and deletion of files. The system can take large files of just about every kind of file type.
- Download - Select a file already in the manager and then download to your PC
- Upload - Select files form your system to upload into the database.
- Delete Document - Select a Document and delete it - Warning! Once a file is removed it cannot be recovered and there currently is no system in place to warn you before deleting.
Query Documents
Rather than download a file one by one, select a date range, one or more categories, and then choose from a static list or a dynamic list of sites to be searched. These files can all be mass downloaded to a folder of your choice.
Input a Query Title that will be the name of your folder. Once downloaded all files from all selected sites /categories will be downloaded.
Since there will be no indication on the file itself an index.html file will be present to show Filename , Description , Category, site Name, and Date
Copyright © 2026 by PRAMS Plus LLC. All Rights Reserved.
|


