Difference between revisions of "Site Maintenance"
| Line 31: | Line 31: | ||
====Adding a Site==== | ====Adding a Site==== | ||
----- | ----- | ||
| − | [[File:Add site.png|thumb| | + | {| class="wikitable" |
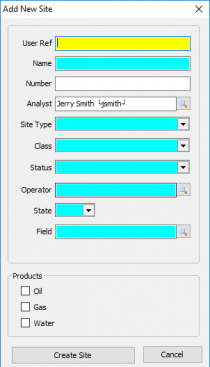
| + | [[File:Add site.png|thumb|right|210px| The window for adding a new site]] | ||
| + | |||
To add a site select the '''Add''' button under the tree view. | To add a site select the '''Add''' button under the tree view. | ||
| − | |||
This will bring up the window to the left and required the following inputs. | This will bring up the window to the left and required the following inputs. | ||
| − | + | |- | |
| − | + | |User Ref | |
| − | + | |A user defined nickname for the Site. | |
| − | + | |- | |
| − | + | |Name | |
| − | + | |The Name for the site. Note the Name is used in the regulatory reporting modules when a well or lease name is required. | |
| − | + | |- | |
| − | + | |Number | |
| − | + | |The Number for the Site. Note the Number is used in the regulatory reporting modules when a well number is required. | |
| − | + | |- | |
| − | + | |Analyst | |
| + | |The Analyst name automatically fills in with the name of the User performing the Add. However, any Analyst previously set up may be chosen for the new site by clicking the spy glass and double clicking the Analyst to be assigned to the Site. | ||
| + | |- | ||
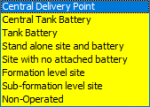
| + | |Site Type | ||
| + | |Assign the Site Type from the drop down. | ||
[[File:Site types.png|border|150px]] | [[File:Site types.png|border|150px]] | ||
| − | + | |- | |
| − | + | |Class | |
| + | |Assign the Class from the drop down. Class is implicated in certain agency regulatory reports. | ||
[[File:Class types.png |border|75px]] | [[File:Class types.png |border|75px]] | ||
| − | + | |- | |
| − | + | |Operator | |
| − | + | |Type the Operator name or click on the spy glass for Address Book entries categorized as Operator(s). | |
| − | + | |- | |
| − | + | |State | |
| − | + | |Assign the State | |
| − | + | |- | |
| − | + | |Field | |
| − | + | |Assign the Field. Start typing the Field name or click on the spy glass for Fields already available in the State. Field is implicated in certain agency regulatory reports. Congruency with the Agency is important. | |
| + | |- | ||
| + | |Products | ||
| + | |Check the Products applicable to the Site. Products will be created and displayed for editing on the Products tab. | ||
| + | |} | ||
When Complete click '''Create Site''' to create the base Site Information and access to the General Site Maintenance tab. | When Complete click '''Create Site''' to create the base Site Information and access to the General Site Maintenance tab. | ||
| Line 71: | Line 81: | ||
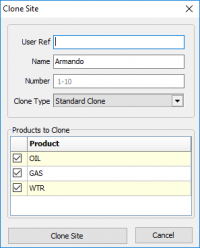
:The Clone Type drop down selections are Standard Clone and Clone to Disposal Site. | :The Clone Type drop down selections are Standard Clone and Clone to Disposal Site. | ||
Cloning to a disposal site will bring over all the same info but change the Site type, Class, and Status. This can be modified in the General tab. | Cloning to a disposal site will bring over all the same info but change the Site type, Class, and Status. This can be modified in the General tab. | ||
| − | + | ||
| − | |||
====Deleting a Site==== | ====Deleting a Site==== | ||
---- | ---- | ||
| Line 80: | Line 89: | ||
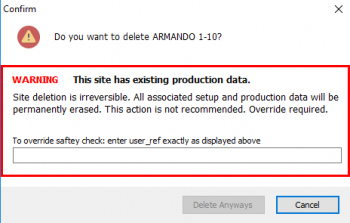
If the site has no production behind it it will delete it. If it does you will have to do the override by entering the user_ref. | If the site has no production behind it it will delete it. If it does you will have to do the override by entering the user_ref. | ||
[[File:Delete site warning.png|border|left|350px]] | [[File:Delete site warning.png|border|left|350px]] | ||
| − | + | ||
===Site Maintenance Tabs=== | ===Site Maintenance Tabs=== | ||
Revision as of 17:17, 23 August 2019
Contents
Vewing and Adding Sites
|
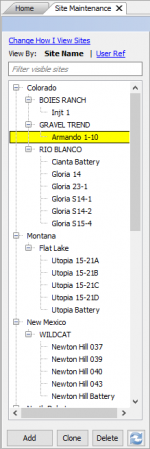
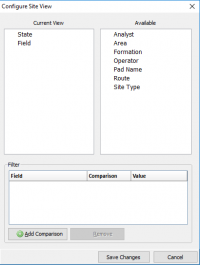
As sites are created they will be stored in a tree view to the left. When you first enter site maintenance the tree view will be blank. To add a site see Adding a Site, to clone an existing site see Cloning a Site, to delete an existing site see Deleting a Site. Click on a Site to view/edit. Clicking on another Site displays the new Site in the same relative screen position. If a change was made the 'Save changes to site?' prompt will display prior to moving to the new Site. This navigation enables quick review of Site information in a focused manner. Selecting Change How I View Sites will open the Configure Site View window: The default layout will be displayed in State\Field order. To select an available option click and drag it to the current view box. There is also an option to Add a Comparison from a field drop-down list that will use a comparison, of 'equals' (=) or 'not-equal'(<>), to any given value. | ||||||||||||||||||||||||||||||||||||||||||||||||||||||||||||||||||||||||||||||||||||||||||||||||||||||||||||||||||||||||||||||||||||||||||||||||||||||
Adding a SiteTo add a site select the Add button under the tree view. This will bring up the window to the left and required the following inputs.
When Complete click Create Site to create the base Site Information and access to the General Site Maintenance tab. | ||||||||||||||||||||||||||||||||||||||||||||||||||||||||||||||||||||||||||||||||||||||||||||||||||||||||||||||||||||||||||||||||||||||||||||||||||||||
Cloning a SiteTo Clone a Site, select the Site to be cloned and click Clone. The following window displays:
Cloning to a disposal site will bring over all the same info but change the Site type, Class, and Status. This can be modified in the General tab. Deleting a SiteTo Delete a site, select the Site and click Delete. The following warning is displayed: If the site has no production behind it it will delete it. If it does you will have to do the override by entering the user_ref.
Site Maintenance TabsGeneral
ProductsProducts types are Oil, Condensate, Gas or Water. All production volumes are associated to a product. Sites can have an unlimited number of Products (to include Products of the same type) to accommodate the various internal data capture and regulatory reporting requirements. Each Product has a separate information page accessed by clicking the Product. When creating products, the order of creation will determine what order the Production Entry screens will appear. Oil
Gas
WaterThe Project Type input field could be defined something like a secondary recovery program. Permission to add, edit or delete data is set in the Admin / User Role Management permissions section (Site Maintenance). Transporter/Destination Information is the same as for the other products. There are no processor, source or buyer information on this page. The Monthly Production Defaults allow you to Create a monthly water production value based on one of three options. Code A is a fixed amount of production entered as the Default Value. Code B is a calculated value based on the Default Value times the number of days a well is on. Code C is a calculated value based on the Water/Oil ratio is the Water per BBL of Oil value entered in the Default Value position. The Disposal code is the default method of disposal of the water:
The default method is unlined pit if no other disposition is noted. During monthly production entry, this will be the default method but you can override the default as needed. LocationCompanyRegulatoryGas AnalysisEquipmentProductionForecastDiaryCopyright © 2019 by PRAMS Plus LLC. All Rights Reserved. |
