Difference between revisions of "Pumper Overview"
m |
m (→GoTo Meeting) |
||
| Line 85: | Line 85: | ||
To learn more click [[GoTo Meeting|here]] | To learn more click [[GoTo Meeting|here]] | ||
| + | |||
| + | |||
| + | ====<u>'''Other Options'''</u>==== | ||
| + | |||
| + | Below the list of sites there are four buttons: | ||
| + | |||
| + | *Edit Selected Site - If you select a site by clicking once you can then select this button and it will open the site for editing. | ||
| + | |||
| + | *Save Changes - Once you have all your changes made to the records, you can select this button to save that data. Alternatively you can select another well prompting a save changes window. | ||
| + | |||
| + | *Exit Entry Process - Selecting this button will close out of pumper if in direct mode and if in offline entry it will take you back to the synchronize screen. | ||
| + | |||
| + | *Other Options - This button will open the following menu where you can change the way the date shows on the entry screen by ascending or descending. | ||
| + | |||
| + | Enable Dynamic Tank Entry that auto shortens the gauges if you have more than three. When you select the gauge it will open up for entry. This is used to save space on the screen especially with Color-cut tanks. | ||
| + | |||
| + | There is a check-mark box that will allow you to auto hide the chart at the bottom if it is in the way rather than hiding it each time. | ||
| + | |||
| + | You can also add colors to your columns signifying the most important entries or show some one which column need to be entered. These can be reset if need be. | ||
| + | |||
| + | Lastly the Password tab will allow you to change your password if you were given permission to do so. | ||
| + | |||
| + | [[File:PumperX2 Other Options.png|border|300px]] | ||
| + | |||
| + | |||
| + | |||
| + | |||
| + | |||
| + | |||
| + | Copyright © {{CURRENTYEAR}} by PRAMS Plus LLC. All Rights Reserved. | ||
Revision as of 22:29, 14 January 2020
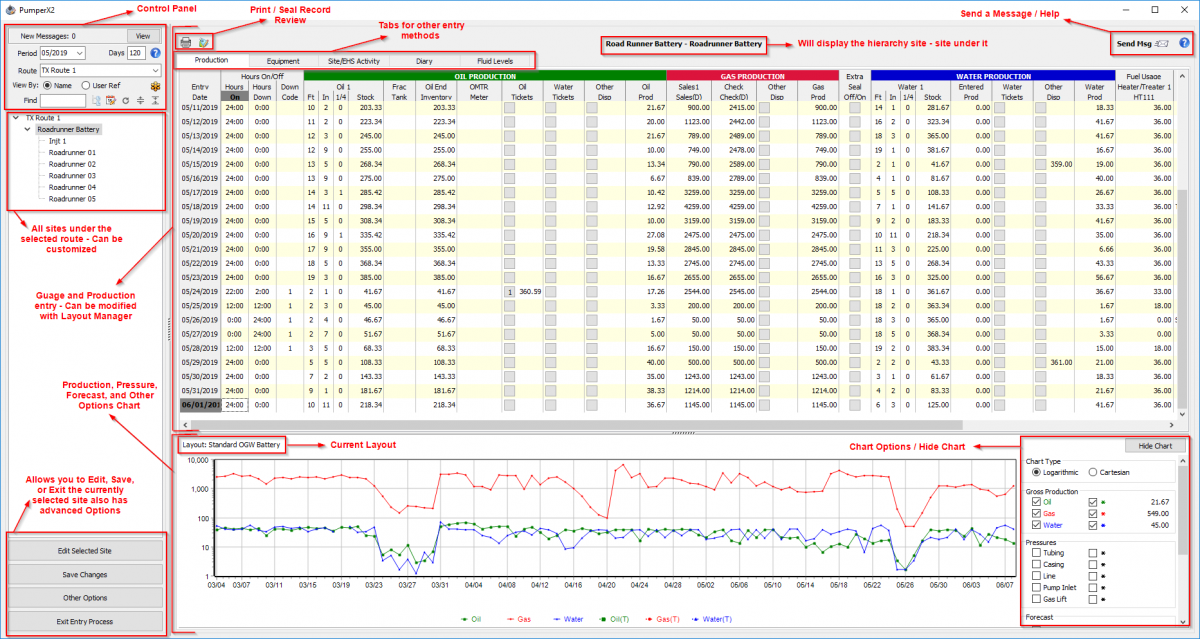
The main screen of PumperX2 will show when 'Start Entry' from the previous screen when the app is launched. This scene will be where the work is done and allow you to view data that has been entered.
Contents
Control Panel
Some of the following features are not availible in offline mode and have to be done another way.
Messages
This section mainly controls behavior of the data presented in the list along with other options in the form of buttons.
The first part will show if you have any available messages from anyone set up in Analyst, this will be highlighted yellow for new messages.
Once open you can select the message from the sender and read, reply, or forward it. Messages cannot be deleted.
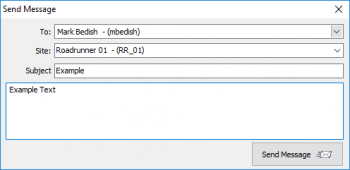
You can also send a message by using the far right symbol next to help on the main screen. You can also view messages on Analyst or Insight Cards.
Site List and Options
To control the list, select a period. If you select the current month it will show as many days as you have set back or how many days you are allowed to view/edit in the permissions under User Maintenance in Analyst.
Next select the route from the drop-down. If you do not see this contact your Analyst to have them assign it to you.
You can view the sites by the User_ref (Name your company uses) or Name (Official Reg name). If you have many wells you can find it in the find box and it will highlight it grey then you can select the well by double clicking.
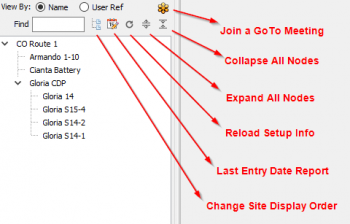
The buttons in the control panel are shown here:
Change Site Display Order
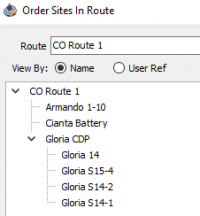
Will open a new window allowing you to click and drag the sites to a custom order. Sites can also be placed into other sites such as a battery with wells.
If the route changes are not ideal you can reset to the original layout.
Last Entry Date Report
Select one of the three options:
Reload Setup Info / Expand Nodes
Selecting the reload symbol will pull in any new changes made outside of the open Pumper program. It is the same as closing and reopening the program. Use this to pull in any layout changes or changes to routes.
If using offline entry, save any changes and sync your data, then reset data to pull down new changes.
Nodes - The last two buttons in the row are to open or close the set ups from the previous 'Change Site Display Order' selection. If you have multiple batteries with wells embedded into it you can close all the batteries at once or open them all at once.
GoTo Meeting
The orange icon is to go to a GoTo Meeting which allows a representative of prams to connect to your PC with a code and help solve an issue.
To learn more click here
Other Options
Below the list of sites there are four buttons:
- Edit Selected Site - If you select a site by clicking once you can then select this button and it will open the site for editing.
- Save Changes - Once you have all your changes made to the records, you can select this button to save that data. Alternatively you can select another well prompting a save changes window.
- Exit Entry Process - Selecting this button will close out of pumper if in direct mode and if in offline entry it will take you back to the synchronize screen.
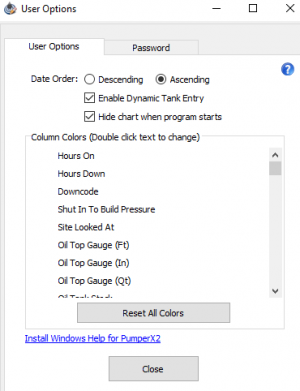
- Other Options - This button will open the following menu where you can change the way the date shows on the entry screen by ascending or descending.
Enable Dynamic Tank Entry that auto shortens the gauges if you have more than three. When you select the gauge it will open up for entry. This is used to save space on the screen especially with Color-cut tanks.
There is a check-mark box that will allow you to auto hide the chart at the bottom if it is in the way rather than hiding it each time.
You can also add colors to your columns signifying the most important entries or show some one which column need to be entered. These can be reset if need be.
Lastly the Password tab will allow you to change your password if you were given permission to do so.
Copyright © 2026 by PRAMS Plus LLC. All Rights Reserved.
