Monthly Allocation Setup
This page will show how to set up your allocations at a monthly level. Allocations start with a source and apply to targets in a hierarchy set up.
To begin it may be more beneficial to set up Daily Allocations first, then come back and set up these allocations as what ever is set up in daily comes over to monthly when setting up and vice versa.
Allocations are performed at a product level such as oil, gas, water, etc. Therefore, each product allocation must be setup individually.
To begin, click on Monthly Allocations Setup in the Monthly Processes Tab.
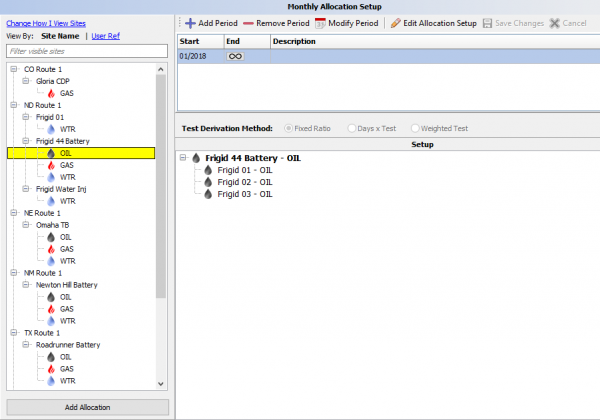
The first time in, the following screen will be presented:
The left side of the display shows any allocations that have been previously setup.
The right side displays the actual setup for whatever allocation you click on. From this panel, a period can be added, removed or modified. An allocation set up can also be edited in this panel.
A period is the time frame that has been set up for the allocation and will be the first window when entering a new product to allocate. If it the set up wont change any time soon leave end date empty.
Note there is a known issue that sometime the end wont allow that and it needs a date, just set the year to be far out and change it when need be.
Rather than setting up an allocation then when a new well comes online, deleting it, just add a new period and end the current one. This will be a good way to keep track of the changes made over time and will also remember to use those time frames to allocate to the correct sites.
To end date or make changes select "Modify Period". If you want to make changes to the targets select "Edit Allocation Set Up". Always remember to save changes.
Adding an Allocation
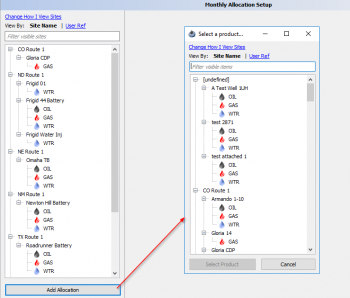
Click Add Allocation and the products without an existing allocation will be present:
From the selection display, pick the first product to allocate. After the first product has been setup, other product setups can be duplicated to different products automatically.
The first time through if the daily allocations have been set up the first product you set up for a site will auto pull over and reduce the time for set up.
For both the completed set up and the to be set up screens a "Change How I View Sites" can be applied. This allows you to filter to just a route or state depending on if you have a lot of wells to set up. If not it may be easier to just filter to the site instead. Make sure to clear the settings if you cannot find the site to allocate.
When you select a Product and enter in a start date and/or a description, you will enter a screen much like when you view a current allocation except this time there will be a list of sites for you to add into the source under Available Targets.
To move the sites you want you can filter to the desired site and then click and drag over to the left pane, or you can double click a site and it will auto place it. Holding Shift will select a range and holding control will allow to select multiple.
Equipment can also be added to the allocation if it has been set up.
Once the sites have been added you can change the Test Derivation Method. Three different algorithms are available for directing how test data will be handled within the allocation algorithm. Click the appropriate radial button and Save Changes.
- Fixed Ratio (The default option) - Allocation based on monthly entered test relationship.
- Days X Test - Number of days times test value equal theoretical production value
- Weighted Test - Average test value for Days times Test
Copyright © 2026 by PRAMS Plus LLC. All Rights Reserved.

