Entering Data with PRAMS X2M
This page will show how to enter data by navigating Routes and sites with helpful visual queues to show data already entered.
Accessing Routes
To start entering you need to have at lease one account setup. For more on setup click here.
Synchronizing Data
A major part of PRAMS X2M like with PumperX2 is the synchronization of data and understanding the process to the be able to send data and receive data.
After an account is setup and when you enter the app for the first time you will arrive on the 'PRAMSPlus Accounts' screen.
Select the account you want to use. Keep in mind if multiple accounts have been setup the screens after will only affect the account chosen.
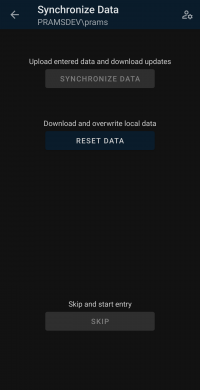
After selecting an account you will be brought to the 'Synchronize Data' screen. At the top just under the page title the account information will be displayed.
If this is the first time syncing data all other buttons but 'Reset Data' will be greyed out to signifying that there is no database to enter data on.
When selected it will pull down the most current information on the companies main database.
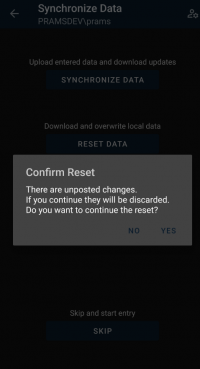
If there currently is data and you try to reset you will receive a warning to confirm the reset.
If 'Yes' is selected then the current data on the phones database will be erased and the current database information on the main server will be pulled down.
If 'No' is selected you will be returned to the sync screen.
Copyright © 2026 by PRAMS Plus LLC. All Rights Reserved.

