Meter Setup
This page will show you how to set up a tank on a Oil or Water Product. You can also copy existing tanks to other products.
Create A Tank
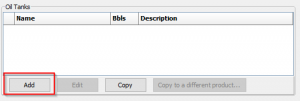
To set up a tank for either a Oil or Water Product go to AnalystX2 > Site > Site Maintenance > Select a site > Select the Products Tab > For either Oil or Water select 'Add'
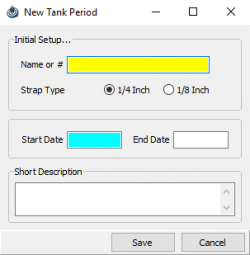
The following screen will appear for both products:
Enter in a name for the tank, select a a Strap Type, and then Create a start date for the tank.
The start date will not allow any gauges to be input before the date provided. If you are unsure of how far back to go use 1900 for the year.
This will ensure you will not miss entering in data as it is easier to update a tank than it is to delete it and re-enter data.
Inches / Increments
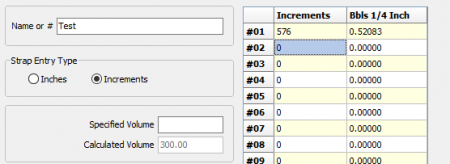
By Default Inches will be selected, you can select Increments before or after you enter in the data.
For inches its recommended you use the tank gauge sheet provided from your strapping service.
If you do not know the strappings you can take your known barrel capacity, divide it by the max ft in the tank and then divide that by 48 to achieve the BBls 1/4 Inch (divide by 96 for 1/8 BBls Inch)
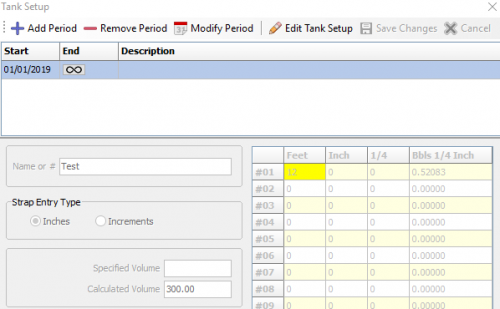
Example: My tank capacity is 300 bbls, my tank height is 12ft and I want my strap type to be in 1/4 inches. I'll take (300/12) = 25/48 = (0.52083 BBls 1/4 Inch).
I'll enter in the 12 for Feet then the 0.52083 for my BBls 1/4 Inch and PRAMS will calculate 300 BBls for the calculated volume.
If you want to find out the Increments, use the method from above and then when you have a calculated volume, select the Increments option and it will fill it out automatically.
You can also add additional notes before saving. When you are done you will be taken back to the Products Tab.
Edit a Tank
To edit a tank select it from the Tank list then select edit.
You the tank setup screen is now grayed out with options at the top.
Periods will show the start and end date that was applied to the tank. Periods are also used throughout the PRAMS suite and its recommended you understand this concept fully.
If you need to modify any data select the period and then change the data. If you need to add new gauge sheet information then end the previous period and create a new period.
This can be done by selecting modify period with a selected previous period. Add in the end date and any description for the period. Once its ended select new period, this will take into account the previous period and bring that data forward.
Selecting Edit Tank Set Up will re-open the Inches/ Increments section. You can also modify the notes.
Keep in mid that anything in the period will be the base when entering in data into the gauges. This WILL NOT recalculate the data. New periods only modify data going forward from the new start date.
This means that if you modify and existing periods tank set up it will not adjust the volumes that the previous settings used.
Its always recommended to have the tank sheet correct and then enter in the data. This isn't always the case and if you do have for example all of January filled out for a tank then change the increments you must go through manually and re-calculate each line. This can be done by placing a different value in for 1/4 inches in pumper and then adding in the previous numbers for the well. Entering in the same value will not re-calculate the line.
Copy a Tank
Copying a tank is useful if you have more than one tank on a site. You can also copy a tank to a different product within prams, this can also be done to other sites outside the current one you're in.
To copy a tank to the same product, select the tank then select the tank and select copy. This will take you to a screen where you can enter in a new name and period, when you select copy it will bring over all the strappings to the new tank.
Copy Tank to A Different Product
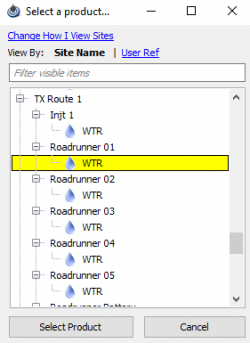
When you select a tank and chose to copy it to a different product the following screen will appear followed by the normal tank copy window:
Once you select a sites' product then enter in the new tank info the tank will have been copied.
Copyright © 2026 by PRAMS Plus LLC. All Rights Reserved.
Site Maintenance / Products - Gas Add Gas Meter
Gas Meters In the Gas Meters section click Add to add a meter to this gas product. The window below will be displayed.
The name and start date are required. Enter the name or ID of the gas meter and a start date in MM/DD/YYYY format then click 'Save'. Once you click 'Save' the following screen will be displayed:
Gas Meter Setup Considerations
As many meters as necessary can be created in this space. The key is the relationship between meters. For example, you can have a Sales Meter and Check Meter, both of which can be marked as being included in the Production calculation but only one "production number" is allowed so the program will use the Check Meter until a Sales Meter value is entered. The same holds true for a Lease Use meter and a Flared meter. You could enter these numbers but NOT include them in the production calculation. In addition to the Disposition Type a linkage could be assigned between meters using the Link Custody selection screen.
Meters may have certain input conditions. For example, there could be a Sales Meter and a Check Meter on a site. The Sales meter does not require daily input since its values are obtained via an outside import or perhaps a daily allocation. In this case, the No Entry box should be checked. The daily data is displayed but cannot be entered because it is sourced from outside. A meter may be informational only, such as a fuel meter. This meter would be entered every day but it would not be used in calculating the daily production totals.
Gas Meter Edit Fields
Name The name or designated ID of the meter. If you plan on matching the entered data to a gas purchase statement or SCADA import this should be the purchasing company meter number. Type The method to be used when entering data for this meter in PumperX2. Standard Methods: Direct Entry, Rolling, Proportional, Square Root, Linear Special Methods: Linear (AL), Linear (CO), Linear (KS), Alternative (CO), Alternative (KS) Special methods should only be used after consulting your support representative.
Disposition The disposition of the gas begin captured: Sales Meter, Check Meter, Lease Use, Flared, Injt On Lease, Injt Off Lease, Gas Lift, Buy Back. Link Custody Valid only if meter type is Check Meter to associate this meter with another Sales Meter that has been defined on this gas product. Last Proved The date this meter was last proved.
Units The unit in which the volume on this meter will be captured. Either MCF of CF.
No Entry Check this box if the meter data is captured via SCADA import or allocation and you do not wish the pumper to modify it.
Include in Production Calc This is checked by default when you create the meter. If you wish to capture data for this meter but not include it in the overall gross production calculation for the gas product you may uncheck it.
The following entries are only required if the meter is a Proportional, Square Root or Linear type.
Temp Base The temperature base used in the meter calculation. Required for Proportional type.
Coefficient The coefficient to use in the meter calculation. Required for Proportional, Square Root and Linear types.
Gas Gravity The gas gravity to use in the meter calculation. Required for Proportional type.
Pressure Base The pressure base to use in the meter calculation. Required for Proportional type.
Spring The spring value to be used in the meter calculation. Required for Proportional type.
Range The range value to be used in the meter calculation. Required for Proportional type.
Meter Factor No entry required. This value will be retrieved based on the spring and range selected.
Tap Type The tap type to be used in the meter calculation. Required for Proportional type.
Run Size The run size to be used in the meter calculation. Required for Proportional type.
Orifice The orifice size to be used in the meter calculation. Required for Proportional type.
BOF Factor No entry required. This value will be retrieved using the tap type, run size and orifice selected.
Copyright © 2026 by PRAMS Plus LLC. All Rights Reserved.

