Difference between revisions of "Server and Database Setup"
m (→Acquire and run the PRAMSX2 Web Installer process.) |
m |
||
| (8 intermediate revisions by the same user not shown) | |||
| Line 75: | Line 75: | ||
----- | ----- | ||
| − | ==='''Prerequisites'''=== | + | ===<u>'''Prerequisites'''</u>=== |
| − | + | ||
Verify that the SQL Server exists and the following items are true: | Verify that the SQL Server exists and the following items are true: | ||
| Line 89: | Line 89: | ||
*You have your company ID and authorization token. | *You have your company ID and authorization token. | ||
| − | === '''Acquire and run the PRAMSX2 Web Installer process.'''=== | + | === <u>'''Acquire and run the PRAMSX2 Web Installer process.'''</u>=== |
| − | |||
| − | The installation package will be provided to you by your PRAMS support representative. It should be run on the application server that you want the PRAMSX2 server application to run on. This can be the same machine SQL Server is installed on or a separate machine as long as the machine has access to the Internet and access to the SQL Server. | + | The installation package will be provided to you by your PRAMS support representative. It should be run on the application server that you want the PRAMSX2 server application to run on. |
| + | |||
| + | This can be the same machine SQL Server is installed on or a separate machine as long as the machine has access to the Internet and access to the SQL Server. | ||
To being the process run the PramsServerX2.exe process provided to you by your PRAMS support representative. | To being the process run the PramsServerX2.exe process provided to you by your PRAMS support representative. | ||
| Line 129: | Line 130: | ||
[[File:Web Installer Digital Key Fob.png|500px]] | [[File:Web Installer Digital Key Fob.png|500px]] | ||
| − | Click next to accept the default settings and create a ‘Default.dkf’ file for use later. The file can be found in the directory C:\ProgramData\PRAMSX2\Default.dkf. You will then be transferred to the X2 Interchange Configuration screen. | + | Click next to accept the default settings and create a ‘Default.dkf’ file for use later. The file can be found in the directory C:\ProgramData\PRAMSX2\Default.dkf. |
| + | |||
| + | You will then be transferred to the X2 Interchange Configuration screen. | ||
| + | |||
| + | [[File:Web Installer Configuration.png|500px]] | ||
| + | |||
| + | Enter the Company ID and Authorization Token provided to you by your PRAMS Plus representative. | ||
| + | |||
| + | The Company ID will be an integer value and the token will be in the form {XXXXXXXX-XXXX-XXXX-XXXX-XXXXXXXXXXXX}. | ||
| − | + | These will be use to authenticate your installation with the X2 Interchange server. If any other instances of the server are active using these same credentials they will be disconnected. | |
| − | + | Once you have entered these parameters click ‘Install’ to begin the installation. A progress screen will be displayed informing you of the status of the installation as shown below. | |
| − | [[500px]] | + | [[File:Web Installer Intall progress.png|500px]] |
The installation is performing several tasks to enable the server: | The installation is performing several tasks to enable the server: | ||
| + | |||
*Retrieving the base database structure and initial table data and applying them to the target database. | *Retrieving the base database structure and initial table data and applying them to the target database. | ||
| + | |||
*Retrieving and installing the necessary server modules. | *Retrieving and installing the necessary server modules. | ||
| + | |||
*Retrieving and installing the task modules designated for the client. | *Retrieving and installing the task modules designated for the client. | ||
| + | |||
*Retrieving the initial client installation modules used by the client install process. | *Retrieving the initial client installation modules used by the client install process. | ||
When the installation is complete the following screen will be displayed: | When the installation is complete the following screen will be displayed: | ||
| − | [[500px]] | + | [[File:Web Installer Intall finish.png|500px]] |
Click ‘Finish’ to close the installation process and launch the Server Manager process to complete the installation. | Click ‘Finish’ to close the installation process and launch the Server Manager process to complete the installation. | ||
| − | [[ | + | [[File:Service manager.png|700px]] |
| − | The Server Manager process is the interface to the server processes. There are three tabs available: Service Monitor, Company Setup and Mail Settings. A brief description of each is provided here with full explanation of all functions available in the AnalystX2 help documentation. | + | The Server Manager process is the interface to the server processes. There are three tabs available: Service Monitor, Company Setup and Mail Settings. |
| + | |||
| + | A brief description of each is provided here with full explanation of all functions available in the AnalystX2 help documentation. | ||
===<u>'''Service Monitor'''</u>=== | ===<u>'''Service Monitor'''</u>=== | ||
| Line 166: | Line 181: | ||
The parameters in this screen control which SMTP server is used to process mail requests when sending push reports. By default the process uses the PRAMS mail server which will work for most users. If you want to use your own mail server you are responsible for maintaining the necessary account information. For more information contact your PRAMS support representative. | The parameters in this screen control which SMTP server is used to process mail requests when sending push reports. By default the process uses the PRAMS mail server which will work for most users. If you want to use your own mail server you are responsible for maintaining the necessary account information. For more information contact your PRAMS support representative. | ||
| + | |||
| + | ===<u>'''Creating the user DFK file'''</u>=== | ||
| + | |||
| + | All client processes that are run within the network acquire their connection parameters from an encrypted file that you create and provide to them. | ||
| + | |||
| + | A default DKF file with the parameters used during the installation of the server side will have been created and stored in C:\ProgramData\PRAMSX2\default.dkf. | ||
| + | |||
| + | If the server name used during the installation is valid for client connections (i.e. not localhost) then you can distribute this file as is. | ||
| + | |||
| + | If you need to or wish to create another DKF file for users to have access to run the DKF Wizard process which can be found in C:\ProgramData\PRAMSX2\server\dkfwizard.exe. Specify the connection parameters, then click ‘Create DKF File’. | ||
| + | |||
| + | In the save dialog that opens specify the name and where you want to save the file and then click ‘Save’. | ||
| + | |||
| + | You have the choice of either providing the DKF file directly to the user to place in a file on their PC or locating the file in a shared location. | ||
| + | |||
| + | ===<u>'''Conversion of Existing PRAMS Plus Data'''</u>=== | ||
| + | |||
| + | Existing clients have the option of converting their original PRAMS Plus well and production data into the new PRAMSX2 system using a standard conversion process. | ||
| + | |||
| + | This process is run on the clients’ server and translates the data from the original database to the new PRAMS X2 database. | ||
| + | |||
| + | Your PRAMS support representative will provide this process to you and assist with its execution. | ||
| + | |||
| + | In order to make sure that the conversion process runs successfully during the installation we recommend that a copy of your existing database be provided in advance of the installation so that it can be tested by development staff. | ||
| + | |||
| + | This will allow us to make any accommodations to the conversion that may be necessary due to non-standard or custom data in the original database tables. | ||
| + | |||
| + | |||
| + | |||
| + | Copyright © {{CURRENTYEAR}} by PRAMS Plus LLC. All Rights Reserved. | ||
Latest revision as of 17:55, 19 December 2019
This page is to help install an instance of the SQL Server database and configure it for use.
Contents
Installing and configuring SQL Server
A Microsoft SQL Server database is used to hold and manage all information associated with PRAMSX2. The first decision you must make is which version of SQL Server you will use. PRAMSX2 is verified to work with all SQL Server versions from SQL Server 2008 to SQL Server 2016, including the Express versions. Your PRAMS support representative will discuss this with you and recommend the best version for your situation.
Regardless of the version you choose to install there are a few items to be aware of when installing or using an existing SQL Server.
Instance Databases
The decision on whether to use instances may be made for you if the SQL Server already exists. If you are installing a new SQL Server you have the option of using them or not. Your PRAMS support representative will discuss whether you should specify instances or not. If instances are used the SQL Server Browser service must be enabled and the users must specify both the host and the instance when connecting to the SQL Server.
Mixed Mode Authentication and TCP/IP
All client processes use a direct TCP/IP connection to the SQL Server. To allow this you must enable mixed mode authentication during the installation process (or enable it later using the SQL Server Management Studio). If you are using an Express version of SQL Server the default setting do not enable TCP/IP connections. Once the installation of SQL Server is complete you will need to use the server configuration manager to enable this. You will be reminded that you need to stop and start the SQL Server service to enable these changes. If you are using an existing SQL Server that has already been installed you can skip the next section and continue on to ‘Creating the PRAMSX2 database user’.
Performing an new installation of SQL Server
Once you have determined which version of SQL Server you will be using you’ll need to acquire the installation package for that version. Whichever version is to be used you should make sure that it includes the SQL Server Management Studio. The installation .exe will normally have ‘WT’ in the filename, which stands for ‘With Tools’.
Run the installation process in normal fashion and accept the default setting provided with the following exceptions:
- Specify that you will use ‘Mixed Mode’ authentication. This mode allows both Windows Authentication and direct SQL authentication. You will be required to specify and ‘sa’ password. This password should be chosen by you and should be a secure password as it is the super user password for the SQL Server.
- Specify whether you will be using instances or not. If you choose to use instances you can either take the default name provided or enter one of your own. We recommend renaming the instance to ‘PRAMS’ so that it is easy to identify once the installation is complete.
The installation of Microsoft SQL Server can take anywhere from 5-30 minutes. Once it is complete close the installation program.
If you have installed an Express version you’ll need to access the SQL Server Configuration Manager and enable TCP/IP as discussed above.
Custom options for database installation
In certain cases you may want to change other items such as the recovery model to use and the location of the mdf/ldf files created for the database. If you think you need to alter these please discuss it with your PRAMS support representative.
Once the database has been created continue on to ‘Defining a database user’.
Creating the PRAMSX2 database
To create the base database open SQL Server Management Studio. Specify the server name and log in using either Windows Authentication or the sa username and password specified during the installation.
Once you have logged in, right click the ‘Databases’ node under the server and select ‘New Database..’.
In the new window that opens specify the name of the database you are creating. We suggest ‘pramsx2’ but you are free to name it anything you want. For most installations this is all you need to do. Click ‘OK’ to create the database.
Creating the PRAMSX2 database user
All processes that communicate with the SQL Server use a login created by you on the SQL Server. If you are not logged in to the SQL Server Management Studio do so as instructed in ‘Creating the base database’.
The user account must have a minimum of dbo type access to the database so the how you define the level of access you assign to this account should be considered within the current security requirements of your organization. If the new database exists in the context of other databases on an existing SQL Server please refer to your database administrators requirements before creating the database user account.
Navigate to the ‘Logins’ item which is under the Security node under the server.
Right click the ‘Logins’ item and select ‘New Login…’.
In the ‘Login – New’ dialog box that opens specify the login name for the account (we suggest ppadmin, but you can use any name you choose) and then change the login type from ‘Windows authentication’ to ‘SQL Server authentication’.
Because you specified ‘SQL Server authentication’ you will need to specify a password for this login. Choose a secure password and enter it in the ‘Password’ and ‘Confirm password’ fields.
Change the ‘Default database’ to be the database you created in the previous step.
If this is a standalone installation we suggest setting the Server Roles for this login account to sysadmin and User mapping to the database you previously created to db_owner.
Click ‘OK’ to create the database user.
Server Installation using the PRAMSX2 Web Installer
Prerequisites
Verify that the SQL Server exists and the following items are true:
- Mixed mode authentication is enabled.
- TCP/IP connectivity is enabled.
- A target database is created (normally ‘pramsx2’).
- A database user has been created with ownership of the target database.
- You have your company ID and authorization token.
Acquire and run the PRAMSX2 Web Installer process.
The installation package will be provided to you by your PRAMS support representative. It should be run on the application server that you want the PRAMSX2 server application to run on.
This can be the same machine SQL Server is installed on or a separate machine as long as the machine has access to the Internet and access to the SQL Server.
To being the process run the PramsServerX2.exe process provided to you by your PRAMS support representative.
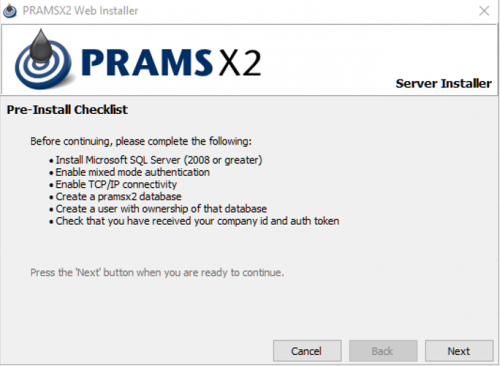
The first screen you will see is the Pre-Install Checklist. If you have followed the previous instructions then you should have everything you need to complete the installation.
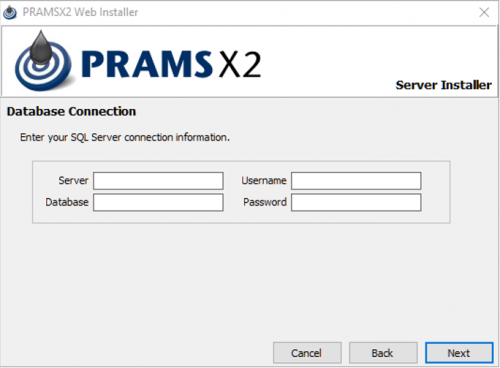
Click ‘Next’ to continue to the Database Connection parameter entry screen.
You must enter the following parameters for each field. Once all parameters have been entered click ‘Next’ to continue.
| Server | The name or IP address of the SQL Server that will host the PRAMS database. Note that if instances are enabled you will need to enter host name or IP address followed by a backslash, then the instance name (ex. MYSERVER\INSTANCE) |
| Database | The name of the database you created to hold the PRAMS data. |
| Username | The database user name that you created on the SQL Server. |
| Password | The password for the user specified in ‘Username’. |
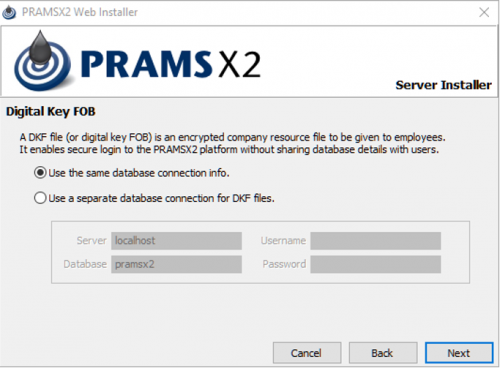
The next screen generates the initial DKF file that will be used by client processes to connect to the SQL Server.
It will default to use the information entered on the previous page. It is recommended that you keep the defaults at this time.
The DKF Wizard tool can be used later to create DKF files for users if needed.
Click next to accept the default settings and create a ‘Default.dkf’ file for use later. The file can be found in the directory C:\ProgramData\PRAMSX2\Default.dkf.
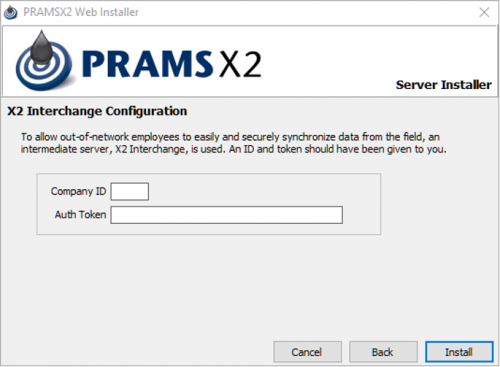
You will then be transferred to the X2 Interchange Configuration screen.
Enter the Company ID and Authorization Token provided to you by your PRAMS Plus representative.
The Company ID will be an integer value and the token will be in the form {XXXXXXXX-XXXX-XXXX-XXXX-XXXXXXXXXXXX}.
These will be use to authenticate your installation with the X2 Interchange server. If any other instances of the server are active using these same credentials they will be disconnected.
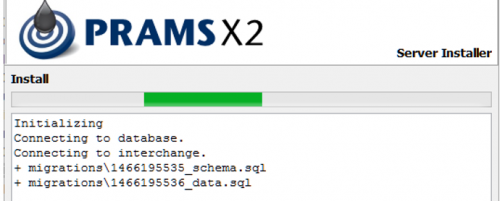
Once you have entered these parameters click ‘Install’ to begin the installation. A progress screen will be displayed informing you of the status of the installation as shown below.
The installation is performing several tasks to enable the server:
- Retrieving the base database structure and initial table data and applying them to the target database.
- Retrieving and installing the necessary server modules.
- Retrieving and installing the task modules designated for the client.
- Retrieving the initial client installation modules used by the client install process.
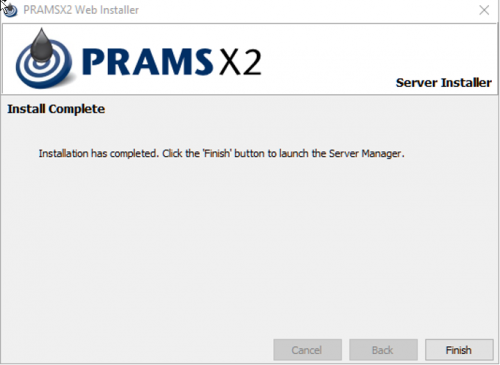
When the installation is complete the following screen will be displayed:
Click ‘Finish’ to close the installation process and launch the Server Manager process to complete the installation.
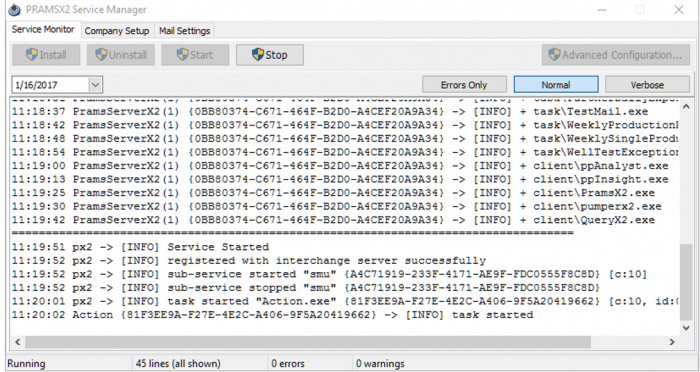
The Server Manager process is the interface to the server processes. There are three tabs available: Service Monitor, Company Setup and Mail Settings.
A brief description of each is provided here with full explanation of all functions available in the AnalystX2 help documentation.
Service Monitor
The service monitor screen is where you install, start, stop and uninstall the Windows Services used by the PramsX2 system. You can also view the log messages generated for each day. Initially this will include the results of the installation.
The Advanced Configuration button is enabled only when the service is stopped. It allows you to manage items such as how many days to keep log files for, enable multiple company configurations, enable version migrations and specify parameters for your connection to the Interchange server. These values have been defaulted to the standard options during the installation and should only be changed after reviewing your requirements with your PRAMS support representative.
Company Setup
The values in this screen were entered as part of the normal installation process. You should not change these values unless instructed to do so by your PRAMS support representative.
Mail Settings
The parameters in this screen control which SMTP server is used to process mail requests when sending push reports. By default the process uses the PRAMS mail server which will work for most users. If you want to use your own mail server you are responsible for maintaining the necessary account information. For more information contact your PRAMS support representative.
Creating the user DFK file
All client processes that are run within the network acquire their connection parameters from an encrypted file that you create and provide to them.
A default DKF file with the parameters used during the installation of the server side will have been created and stored in C:\ProgramData\PRAMSX2\default.dkf.
If the server name used during the installation is valid for client connections (i.e. not localhost) then you can distribute this file as is.
If you need to or wish to create another DKF file for users to have access to run the DKF Wizard process which can be found in C:\ProgramData\PRAMSX2\server\dkfwizard.exe. Specify the connection parameters, then click ‘Create DKF File’.
In the save dialog that opens specify the name and where you want to save the file and then click ‘Save’.
You have the choice of either providing the DKF file directly to the user to place in a file on their PC or locating the file in a shared location.
Conversion of Existing PRAMS Plus Data
Existing clients have the option of converting their original PRAMS Plus well and production data into the new PRAMSX2 system using a standard conversion process.
This process is run on the clients’ server and translates the data from the original database to the new PRAMS X2 database.
Your PRAMS support representative will provide this process to you and assist with its execution.
In order to make sure that the conversion process runs successfully during the installation we recommend that a copy of your existing database be provided in advance of the installation so that it can be tested by development staff.
This will allow us to make any accommodations to the conversion that may be necessary due to non-standard or custom data in the original database tables.
Copyright © 2026 by PRAMS Plus LLC. All Rights Reserved.
