Difference between revisions of "Getting Started with PRAMS X2M"
m |
m |
||
| (3 intermediate revisions by the same user not shown) | |||
| Line 1: | Line 1: | ||
| − | ''This page will show how to | + | ''This page will show how to set up PRAMS X2M and start entering daily data.'' |
----- | ----- | ||
| Line 6: | Line 6: | ||
---- | ---- | ||
| + | ====<u>Analyst Permission Requirement</u>==== | ||
| + | |||
| + | In order for people to use this app they first need the permission to do so. | ||
| + | |||
| + | This can be done by going to AnalystX2 > Admin > User Role Management > Select the role(s) that need the permission > Scroll to the very bottom of the permission list > On the "Pumper iOS/Android App" dropdown select "allow access" > At the top select save changes. | ||
| + | |||
| + | * note that the iOS app is not yet available | ||
| + | |||
| + | Make sure to apply this to all roles that will be using the app. | ||
====<u>Downloading the App</u>==== | ====<u>Downloading the App</u>==== | ||
| − | |||
Currently in internal beta and will be released to the Play Store soon! | Currently in internal beta and will be released to the Play Store soon! | ||
| − | |||
====<u>Setting Up an Account</u>==== | ====<u>Setting Up an Account</u>==== | ||
| Line 28: | Line 35: | ||
After the account is setup you can add another by clicking the '+' button in the bottom right corner. | After the account is setup you can add another by clicking the '+' button in the bottom right corner. | ||
| + | |||
| + | ====<u>Resetting Data</u>==== | ||
| + | |||
| + | Once the account has been setup, to pull down your data select the account you want to use (if multiple) and select 'Reset Data'. | ||
| + | |||
| + | Note that the other buttons are grey, signifying that there is nothing to sync or enter on. | ||
| + | |||
| + | If there currently is data and you try to reset, you will receive a warning to confirm the reset. | ||
| + | |||
| + | If 'Yes' is selected, then the current data on the phones database will be erased and the current database information on the main server will be pulled down. | ||
| + | |||
| + | If 'No' is selected, you will be returned to the sync screen. | ||
| + | |||
| + | [[File:X2m 2.png|border|200px]] | ||
| + | [[File:X2m 3.png|border|200px]] | ||
| + | |||
====<u>Entering Data</u>==== | ====<u>Entering Data</u>==== | ||
| − | + | Once your accounts are set up and 'Reset Data' has finished the screen will open to the Routes page and you can select a route then a site and start entering. | |
| − | Once your accounts are | ||
To learn more about entering data click [[Entering Data with PRAMS X2M|here]]. | To learn more about entering data click [[Entering Data with PRAMS X2M|here]]. | ||
| + | ====<u>Removing Accounts</u>==== | ||
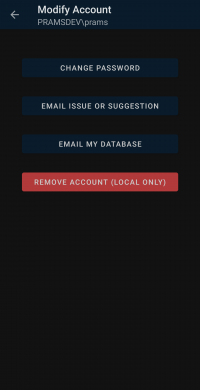
| + | To remove an existing account, select the cog wheel at the top right of the 'Synchronize Data' screen. | ||
| + | Then when on the 'Modify Account' screen select 'Remove Account'. This action will only remove it from your device and not from the company altogether. | ||
| − | + | [[File:X2m 4.png|border|200px]] | |
| + | [[File:X2m 5.png|border|200px]] | ||
Latest revision as of 17:17, 17 February 2025
This page will show how to set up PRAMS X2M and start entering daily data.
Contents
Analyst Permission Requirement
In order for people to use this app they first need the permission to do so.
This can be done by going to AnalystX2 > Admin > User Role Management > Select the role(s) that need the permission > Scroll to the very bottom of the permission list > On the "Pumper iOS/Android App" dropdown select "allow access" > At the top select save changes.
- note that the iOS app is not yet available
Make sure to apply this to all roles that will be using the app.
Downloading the App
Currently in internal beta and will be released to the Play Store soon!
Setting Up an Account
In order to setup an account, after the app has been downloaded you will need the following to continue:
- Company EDI Name - Can be obtained from Analyst or PRAMS team email support@pramsplus.com or call 303-904-6855 Opt.1
- Username - Your Analyst can provide.
- Password - Your Analyst can provide.
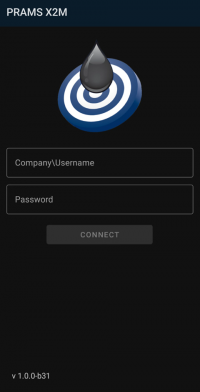
Once you have your credentials enter in your company EDI name followed by a backslash ' \ ' then your username. Do not include any spaces. Then enter your password and select 'Connect'.
Note on the bottom left is the app version and this information could be helpful to provide your PRAMS representative if there is an issue.
After the account is setup you can add another by clicking the '+' button in the bottom right corner.
Resetting Data
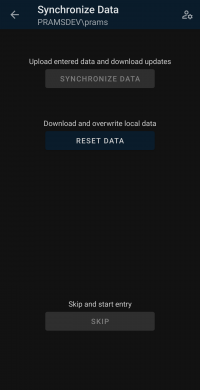
Once the account has been setup, to pull down your data select the account you want to use (if multiple) and select 'Reset Data'.
Note that the other buttons are grey, signifying that there is nothing to sync or enter on.
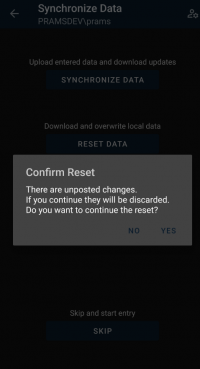
If there currently is data and you try to reset, you will receive a warning to confirm the reset.
If 'Yes' is selected, then the current data on the phones database will be erased and the current database information on the main server will be pulled down.
If 'No' is selected, you will be returned to the sync screen.
Entering Data
Once your accounts are set up and 'Reset Data' has finished the screen will open to the Routes page and you can select a route then a site and start entering.
To learn more about entering data click here.
Removing Accounts
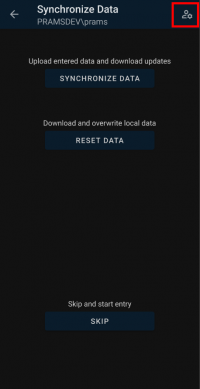
To remove an existing account, select the cog wheel at the top right of the 'Synchronize Data' screen.
Then when on the 'Modify Account' screen select 'Remove Account'. This action will only remove it from your device and not from the company altogether.
Copyright © 2025 by PRAMS Plus LLC. All Rights Reserved.
