Difference between revisions of "Focus Inspections"
m |
m (→Inspections) |
||
| Line 25: | Line 25: | ||
The ‘Select Inspection’ screen allows you to select from the available inspections. | The ‘Select Inspection’ screen allows you to select from the available inspections. | ||
| − | Currently the four inspections | + | Currently the four inspections supported are: |
*Enhanced AVO | *Enhanced AVO | ||
Latest revision as of 20:45, 8 November 2024
The PRAMS Focus inspection app for IOS devices allows you to complete various inspections including capturing time location information that can be included as part of the inspection to meet regulatory requirements.
- Getting Started
- How to download the app and setup a company. If you haven't downloaded the apps, start here.
- Requesting Help
- How to share your screen for mobile support.
Using PRAMS Focus
When first opening the app if only one company is set it will skip the 'Select Login' screen and send you to the 'Select Inspection Screen'
If multiple accounts exist then you will first arrive on the ‘Select Login’ screen which will allow you to perform three actions. To configure multiple accounts see App Login click here.
- Start an inspection. To do this click on the company that you want to do the inspection for which will take you to the ‘Select Inspection’ screen.
- The ‘+ Add Login’ button at the bottom of the screen which will return you to the Login screen to enter another company’s user account information.
- The ? button at the top right. Clicking this will take you to the Apple App Store where you can download and install the Airdroid Remote Support app which can be used when you contact PRAMS support to share your screen to the support representative. For AirDroid setup and information click here
Inspections
The ‘Select Inspection’ screen allows you to select from the available inspections.
Currently the four inspections supported are:
- Enhanced AVO
- Simple AVO
- Facility
- Method 22
To start an inspection click on the inspection you wish to perform.
The app will then try to find the closest sites to you if the latitude and longitude have been specified for the sites and will switch to the ‘Nearby Sites’ screen.
Latitude and Longitude are configured in AnalystX2 > Site Maintenance > Location Tab.
If location information exists the sites closest to you will be listed by the distance from your current location. Make sure to turn on your GPS for this to work.
To continue, click a site to start the inspection.
Alternatively If the location information has not been specified and no nearby sites are found you can click ‘View all sites…' in the middle of the screen to switch to the site selection screen.
There are four action buttons available in this screen:
 - switch to a screen that lists completed inspections that you can review.
 - switch to a screen that lists submitted pictures to review.
 - switch to the site selection screen.
 - connect to the company’s server and re-pull the available sites based on the routes you have been assigned.
Once you have selected the site to complete an inspection for the next screen shown is dependent on the inspection you selected to perform.
Taking a Picture
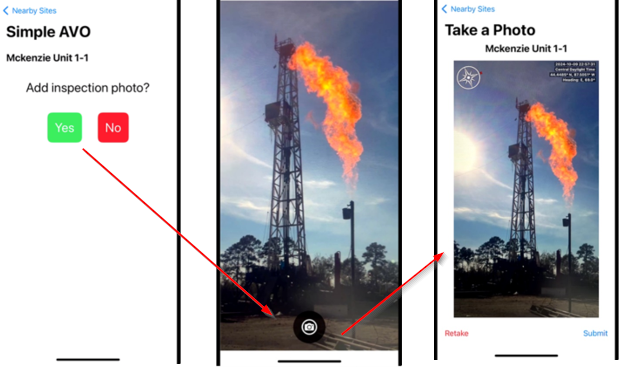
If you have selected to complete a Method 22 inspection you must take a picture of the site and so the screen will switch to the ‘Take a Photo’ screen.
For all other inspection types the photo is optional so you will be asked if you want to take a picture.
If you click yes you will step through the picture process, if you click no you will skip to the inspection form.
The picture taking process will open your camera and allow you to take a photo.
Take into consideration that when taking the picture: the compass direction, latitude, longitude, date, time, and time zone are all captured during this process.
The captured information is especially important for the Method 22 inspection as the photo will be used as part of the inspection instead of the drawing done in PumperX2.
After you take the picture you can review it before continuing. If the picture is suitable, click ‘Submit’ button at the bottom right of the screen.
If you want to retake the picture click ‘Retake’ at the bottom left of the screen.
Once the picture has been accepted the screen will switch to the inspection form for you to answer the questions for the inspection.
Filling out an Inspection
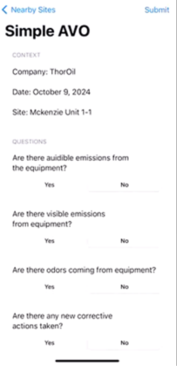
The questionnaire shown will be dependent on the inspection type selected. Inspection questions can be altered in AnalystX2.
In this example the Simple AVO inspection is shown. All other inspections follow a similar format with yes or no questions, text boxes, time, and number inputs.
To complete the inspection answer the questions asked and then click the ‘Submit’ button at the top right of the screen.
Note that this button will be disabled until all required questions have been answered.
Once you click the submit button a final validation will occur and if successful the screen will indicate that the inspection is complete.
When complete the screen will switch back to the ‘Select Inspection’ screen to allow you to start another inspection if necessary.
Copyright © 2026 by PRAMS Plus LLC. All Rights Reserved.

