Difference between revisions of "Initial Set-up PumperX2"
m |
m |
||
| Line 5: | Line 5: | ||
To only install PumperX2 go to [https://pramsplus.com pramsplus.com] > in the menu bar in the top right select downloads > Then select PumperX2, a download will begin shortly. | To only install PumperX2 go to [https://pramsplus.com pramsplus.com] > in the menu bar in the top right select downloads > Then select PumperX2, a download will begin shortly. | ||
| − | [[File:Pumper installer pp web.png| | + | [[File:Pumper installer pp web.png|border|805px]] |
If in Chrome the file will be on the bottom left > Click and run the exe file | If in Chrome the file will be on the bottom left > Click and run the exe file | ||
Revision as of 22:35, 3 March 2022
This page will show how to install pumper on a a new PC or laptop.
◄ PumperX2
To only install PumperX2 go to pramsplus.com > in the menu bar in the top right select downloads > Then select PumperX2, a download will begin shortly.

If in Chrome the file will be on the bottom left > Click and run the exe file
Otherwise if in Firefox or internet explorer go to your downloads to run the file.
After it runs you will see the following screen:

Enter in the company name that matches what prams added under the EDI name. If you do not have this info a Prams Representative can assist you.
It is typically the first part of the companies name with the first letter capitalized.
The Pumper ID and password will be whatever was set up by the analyst in User Maintenance under the Admin toolbar.
When all the info has been entered then select "Install".
The installer will then check the credentials and if all passes it will then create a pumperx2 icon on the desktop and allow that user to go into both run modes.
Login Screen Set-Up
When at the login screen you will have two options:
- Direct Mode (Connected to Network)
To set up the login screen select the DKF and enter in the username and password. Its also optional to save the login info for next time.
This mode is usually for people who are in the office directly connected to the companies network. This is also for users who are on Prams Hosted Network.
Both require a strong internet connection.
A VPN connection will also allow you to connect to any of the Prams Programs, this will need to be set up via your companies IT department.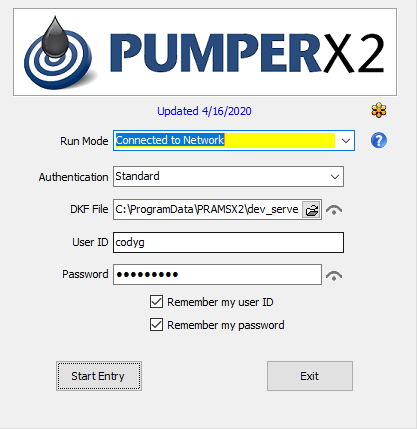
- Offline Mode (Offline Entry w/EDI Sync)
To set up the login screen select Configure then Add new connection, this will then prompt you for the company EDI name (Call Prams 303-904-6855 if you do not have this info), followed by the username and password.

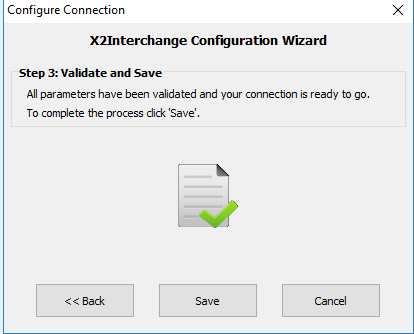
- Select Next and if you see a screen with a green checkmark you have succecfully set up the user. Select Save to go mack to the main screen.
Make sure the first time to go into Synchronize and then select Reset Data, this will pull down your routes and the data.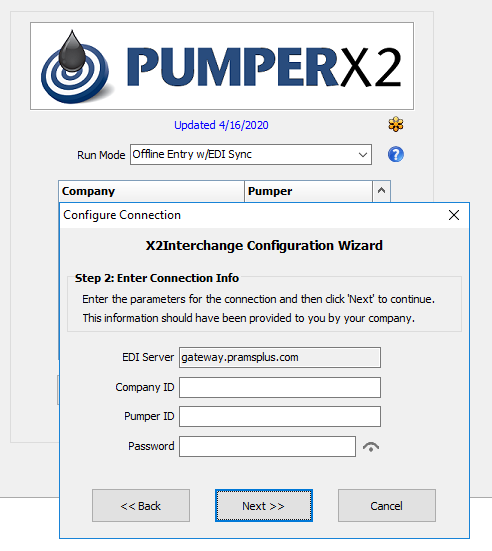
- To do this select your ID, if there are multiple IDs, and then click 'Synchronize' which will take you to the following screen:
- Select Next and if you see a screen with a green checkmark you have succecfully set up the user. Select Save to go mack to the main screen.


- Select Reset Data and make sure the sync log doesn't contain any errors, when this is done Pumper is configured and will remember your changes. Click Exit Sync and then click Start Entry:

For additional help see PumperX2.
Copyright © 2026 by PRAMS Plus LLC. All Rights Reserved.